Travel photography is one of the most rewarding ways to capture and preserve memories of your journeys. Yet many travelers return home with technically correct but uninspiring photos that fail to evoke the magic they experienced. The difference between mediocre travel photos and images that move viewers isn't necessarily expensive equipment—it's understanding fundamental principles and applying them consistently. This guide reveals ten practical photography tips that will elevate your travel images from documentation to storytelling.
Whether you're traveling with a smartphone, a basic mirrorless camera, or professional-grade equipment, these principles apply universally. Mastering these fundamentals will improve your photography more than upgrading gear ever will.
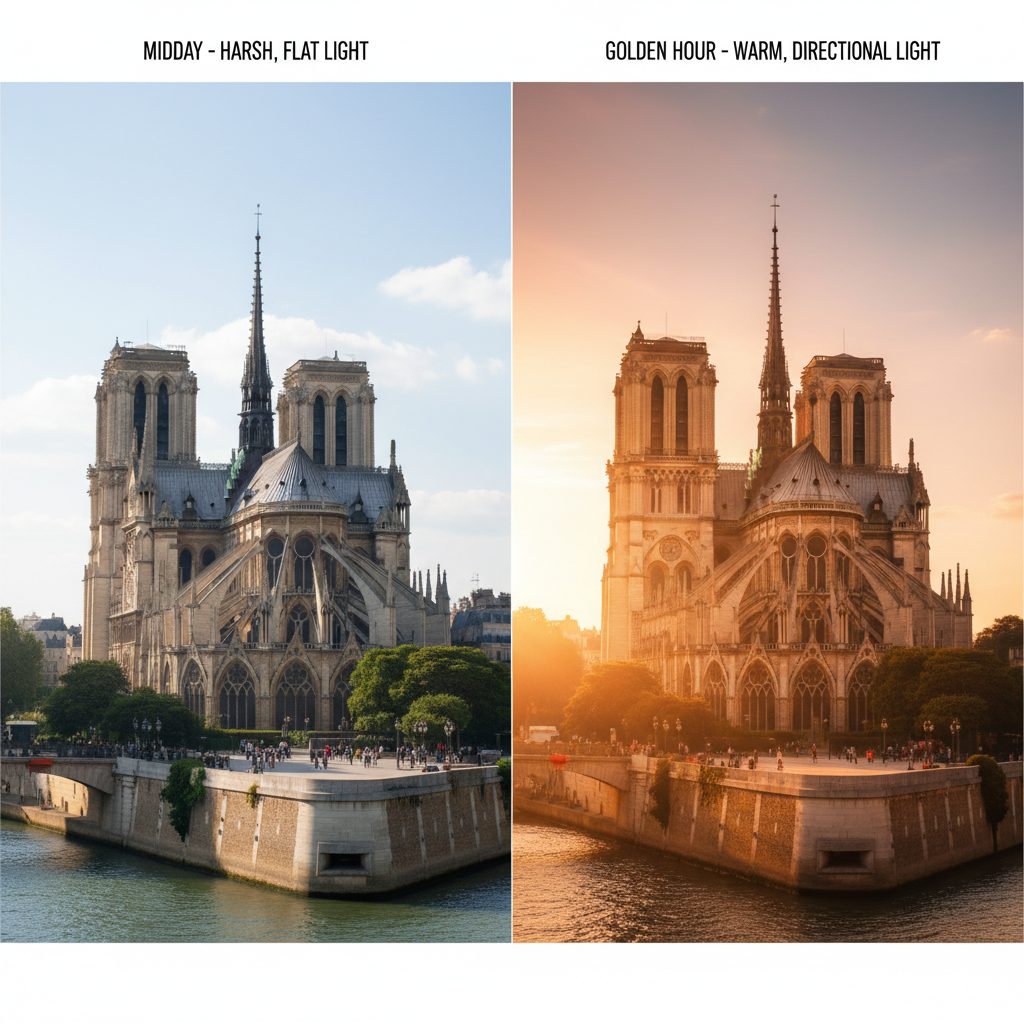
1. Master the Golden Hour
The golden hour—the first hour after sunrise and the last hour before sunset—provides light that's warm, directional, and flattering to nearly every subject. This magical light transforms ordinary scenes into extraordinary images. The warm color temperature, the low angle of sun, and the longer shadows create depth and dimension impossible to achieve at midday.
Plan your most important photography during these hours. Wake early for sunrise shoots; the early light is softer than sunset and there are fewer crowds at popular locations. Late afternoon golden hour provides dramatic side lighting that emphasizes texture and creates compelling shadows.
The practical implication: if you're visiting an iconic landmark, shoot it during golden hour rather than midday. A temple photographed at golden hour becomes a transcendent image; the same temple at noon looks flat and harsh regardless of your camera.
Pro Implementation
- Check sunrise/sunset times for your destination before traveling
- Plan one golden hour shoot per day as a non-negotiable priority
- Wake an hour before sunrise to scout locations and set up before optimal light
- Stay shooting until the last traces of light fade; some of the best light comes in the final moments
2. Compose with the Rule of Thirds and Leading Lines
The rule of thirds is a foundational composition principle that creates more dynamic, engaging images than simply centering your subject. Imagine dividing your frame into a 3x3 grid and placing important elements along the grid lines or at intersections. This off-center placement creates visual tension and interest.
Beyond rule of thirds, leading lines guide viewer's eyes through your image toward your subject. Roads, rivers, fences, or architectural lines create depth and draw attention to your composition's focal point. A street receding into distance, a fence line leading toward a mountain, or a river winding through a landscape all serve as leading lines.
Most modern cameras and smartphone cameras include a rule of thirds grid overlay in their settings. Enable this feature and practice framing subjects along the grid lines. After consistent practice, the principle becomes intuitive, and you'll naturally compose stronger images.
"Composition is everything. You can have perfect technical exposure, perfect focus, but if the composition is weak, the image fails. Master composition and your photos will improve exponentially even with basic equipment."
Composition Practice Exercise
For your next photographic session, force yourself to compose using rule of thirds for every single shot. Don't take any centered compositions. After 50-100 images, review them. You'll notice the off-center compositions are more visually interesting and engaging than any centered shots would have been.
3. Capture the Golden Hour's Warmth in Color
Golden hour light creates naturally warm color temperatures that feel welcoming and nostalgic. However, automatic white balance can neutralize this warmth. In golden hour conditions, set your camera's white balance to "Daylight" or a specific Kelvin temperature (around 5500K) rather than "Auto" to preserve the warm color cast that makes golden hour special.
This principle applies even more critically with smartphone photography. Most smartphones aggressively adjust white balance, potentially stripping golden hour's signature warmth. Use your phone's manual mode or third-party apps like Lightroom Mobile to set a specific color temperature and preserve the light's character.
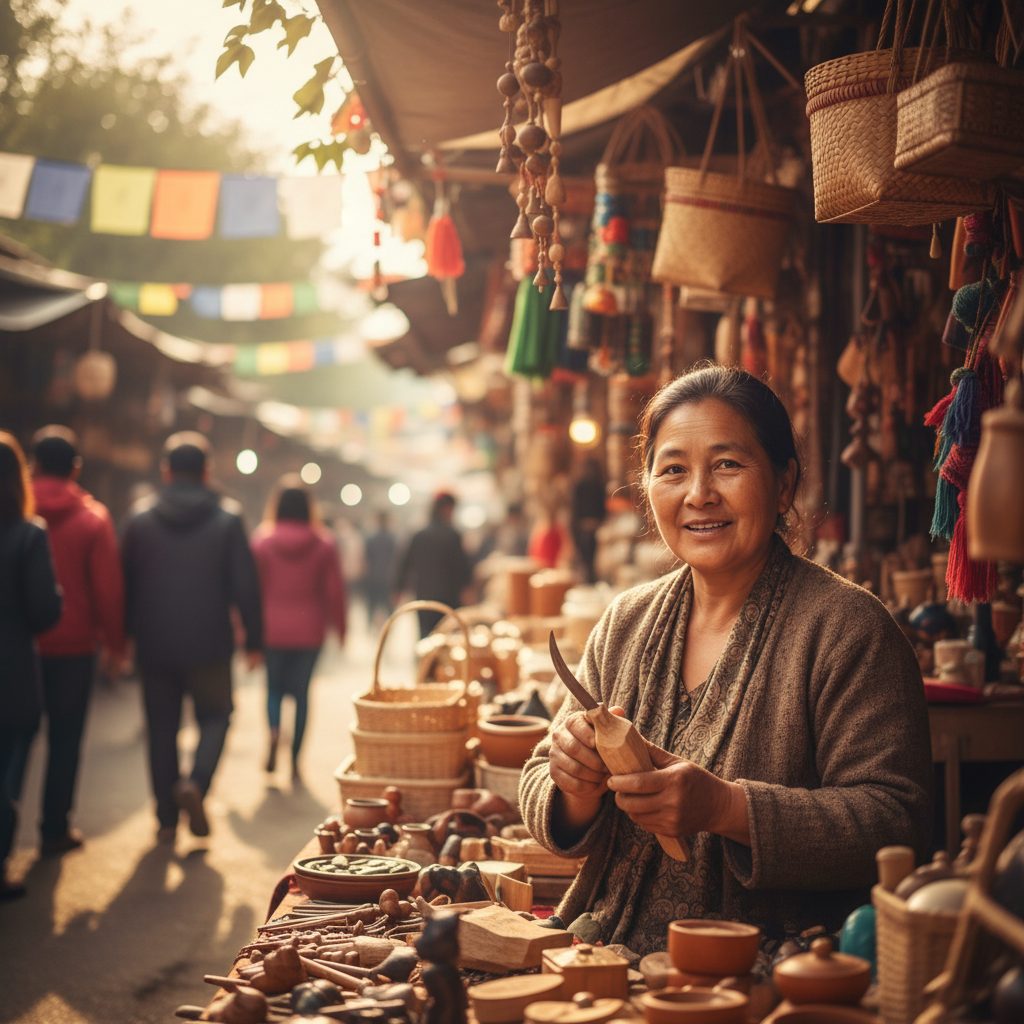
4. Tell Stories with Environmental Portraits
Instead of photographing people as isolated subjects against blurred backgrounds, incorporate the environment to tell richer stories. An environmental portrait—someone photographed in their context, surrounded by elements that define them—conveys far more than a face-only close-up.
Photograph a local vendor in their shop surrounded by merchandise. Capture a monk against the temple backdrop that defines their spiritual practice. Frame a market vendor amid the chaos and colors that characterize their workspace. These contextual images create narratives and transport viewers directly into your travel experience.
Respectful Photography of People
Always ask permission before photographing people, especially in markets, temples, and cultural settings. Learn a few phrases in the local language asking if you can take a photo. Most people appreciate being asked and often become more relaxed and genuine once they understand your intent. Showing people images of themselves on your camera screen creates connection and reciprocal goodwill.
Avoid photographing sacred ceremonies or spiritual practices without specific permission. Some cultures believe photography steals the soul; respect these beliefs even if you don't share them. Sacred moments are meant to be experienced, not merely documented.
5. Shoot in Raw Format When Possible
Raw files capture all the light and color information your camera sensor records. JPEGs, by contrast, are processed and compressed by your camera's internal algorithms. Shooting in raw gives you maximum flexibility during editing—you can recover shadow detail, adjust white balance, and control color in ways impossible with JPEGs.
The downside: raw files are large and require post-processing. However, the creative control and quality improvement justify the extra effort. Most serious photographers shoot raw exclusively while traveling, accepting the storage requirements and processing time as necessary trade-offs for maximum flexibility.
For smartphone photography, research whether your device has a raw mode. Many modern flagship phones (iPhone 12 Pro+, latest Samsung flagships) support raw capture through third-party apps. Using Lightroom Mobile, you can shoot and edit raw images directly on your phone.
Storage Strategy for Raw Files
Raw files are large; a typical camera generates 50-100 MB per image. Traveling with days of raw photography can fill storage quickly. Invest in multiple high-capacity SD cards, bring an external hard drive, and use cloud backup services. Budget at least 100 GB of storage for a two-week trip with regular photography.
6. Focus on Texture and Detail Photography
While landscape and portrait photography capture obvious travel moments, texture and detail photography reveals the essence of places. Photograph weathered paint, intricate carvings, traditional patterns, aged textures, and local craftsmanship in detail. These images create abstract beauty and convey the character of your destination.
Close-up and macro photography reveal worlds invisible to the naked eye. The intricate details of traditional textiles, the texture of ancient stone, the patterns of local architecture—these details tell stories of history, culture, and craftsmanship. A photograph of a worn wooden door handle conveys the history embedded in ordinary objects more powerfully than a wide shot of the entire building.
Macro lenses are specialized equipment, but smartphone macro modes (increasingly common in newer models) can achieve stunning close-up photography. Even basic smartphone close-ups reveal details that humanize and personalize your travel photography.
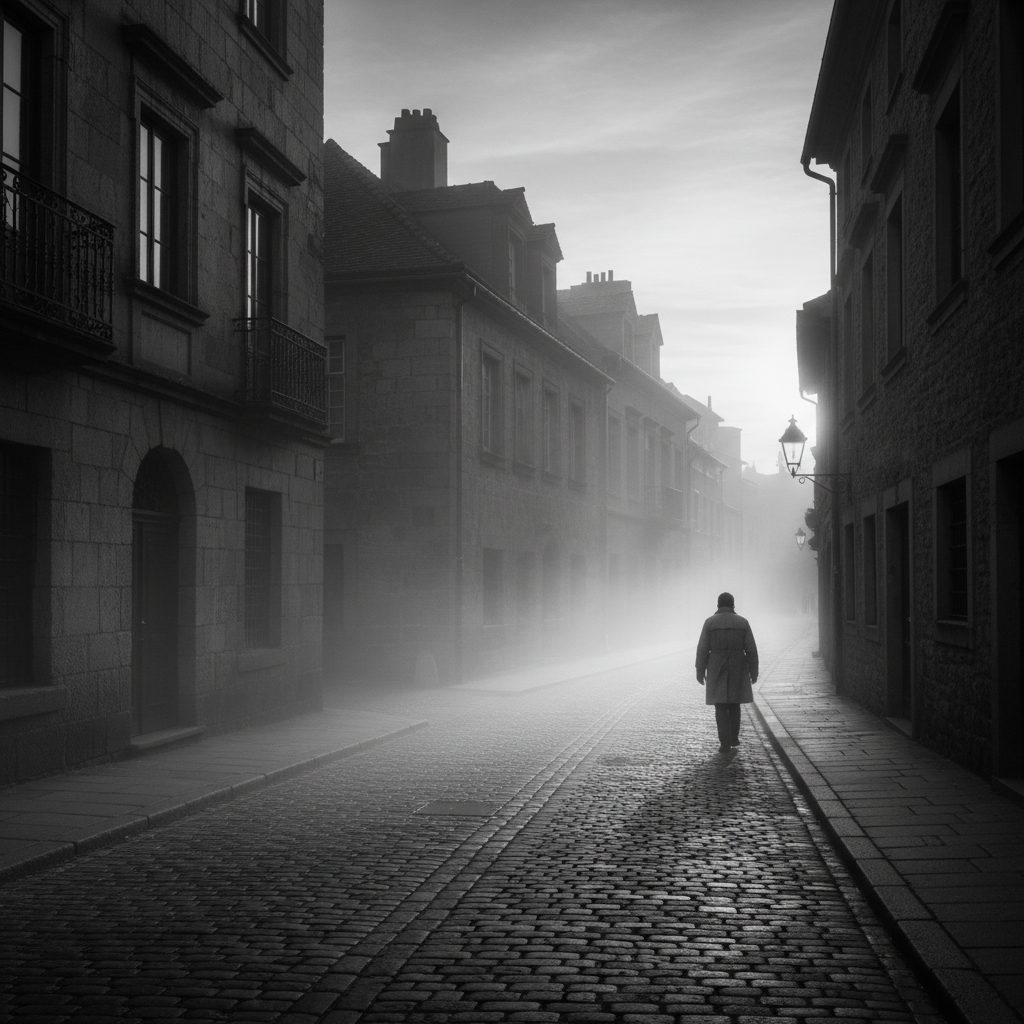
7. Embrace Monochrome (Black and White) Photography
While color photography is appealing, monochrome (black and white) photography often conveys emotion and impact more powerfully. Removing color eliminates distraction and forces composition, contrast, and light to carry the image. Monochrome is particularly effective for portraits, architectural photography, and images with strong geometric patterns.
Shoot in raw color files, then convert to black and white during editing. This flexibility allows you to choose the most effective format for each image. Some images benefit from color; others are more powerful in monochrome.
8. Master Your Camera's Exposure Triangle
The exposure triangle—combining aperture, shutter speed, and ISO—controls how your images look. Understanding this relationship transforms you from pressing the shutter button to consciously creating images.
Aperture (f-stops like f/2.8, f/5.6)
Controls how much light enters and the depth of field (how much is in focus). Wider apertures (f/2.8) create shallow depth of field with blurred backgrounds; narrower apertures (f/16) keep more of the image sharp. Use shallow depth of field for portraits and dynamic subjects; use deeper depth of field for landscapes where you want everything sharp.
Shutter Speed
Controls how long light hits the sensor. Fast shutter speeds (1/1000 second) freeze motion; slow shutter speeds (1 second or longer) create motion blur. Use fast shutter speeds for moving subjects; use slow speeds for light trails, waterfalls, and intentional motion effects.
ISO
Sensor sensitivity to light. Higher ISO allows shooting in dim light but introduces grain/noise. Lower ISO produces cleaner images but requires more light. Use low ISO (100-400) in bright conditions; increase ISO only when necessary for shutter speed or aperture control in dim light.
Exposure Triangle Learning Path
Start with your camera's aperture priority mode (Av/A). You control aperture; the camera adjusts shutter speed. This teaches aperture's effect on depth of field while automation handles exposure. Once comfortable, try shutter priority mode (Tv/S), controlling motion while the camera manages aperture. Finally, graduate to full manual mode (M) where you control everything.
9. Use Editing Thoughtfully
Editing is integral to modern photography. Adjusting exposure, contrast, color, and clarity enhances your images. However, over-editing creates unrealistic, garish images that look obviously manipulated. Edit with restraint; the goal is enhancement, not transformation.
Essential editing tools: exposure (adjust overall brightness), contrast (enhance shadows and highlights), saturation (color intensity), clarity (midtone contrast), shadows/highlights (recover detail in dark or bright areas), and white balance (color temperature adjustment). These basic adjustments solve 90% of editing needs.
Use software like Adobe Lightroom (the industry standard), Capture One, or smartphone apps like Snapseed or Lightroom Mobile. Develop a consistent editing style—slightly warm color temperature, enhanced contrast, subtle clarity boost—that gives your photos a cohesive look across your travel collection.
10. Develop a Shooting Ritual and Intentional Photography Practice
The difference between snapshot photographers and serious travel photographers isn't equipment—it's intentionality. Snapshot photographers react to scenes; serious photographers anticipate moments and compose consciously.
Develop a ritual: upon arriving at a location, spend 10 minutes observing before shooting. Look for interesting light, compelling compositions, and moments worth capturing. Move around the location from different angles, looking at how light transforms the scene from various perspectives. This observation period transforms your photography from reactive to intentional.
Limit yourself—instead of shooting everything, be selective. Choose three locations per day to photograph thoroughly rather than five locations photographed superficially. Quality improves when you invest time in understanding light and composition at specific places rather than rushing between sites.
"The best camera is the one you have with you. But the best photographer is the one who thinks before shooting, who understands light, and who composes intentionally. Master these practices with a smartphone and you'll create better images than someone with an expensive camera and no understanding of fundamentals."
Building Your Photography Skills
Photography skill develops through consistent practice and deliberate study. Every trip is an opportunity to refine your craft. Review your images critically—what worked? What didn't? What would you do differently if you could reshoot?
Study photographs you admire. What makes them effective? Analyze the light, composition, and subject matter. Seek to understand the photographer's decisions. Over time, patterns emerge, and you internalize the principles governing compelling photography.
Most importantly, travel with your camera and shoot regularly. Technical perfection comes from thousands of hours of practice. Every sunset, every market, every temple visited is an opportunity to apply and refine these principles. Your travel photography will improve dramatically within weeks of consistent, thoughtful practice.
Travel photography isn't about having the best gear—it's about seeing light, understanding composition, respecting your subjects, and telling stories through images. Master these fundamentals, and your travel photography will transcend simple documentation, becoming a meaningful artistic record of your adventures.